2006 V-Rod Night Rod – Slammed-V
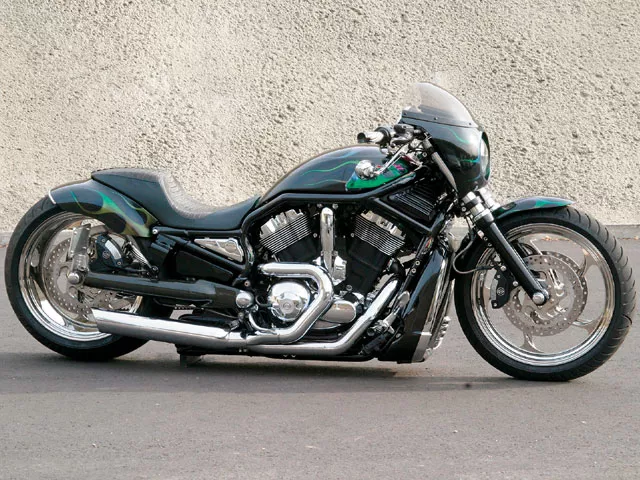
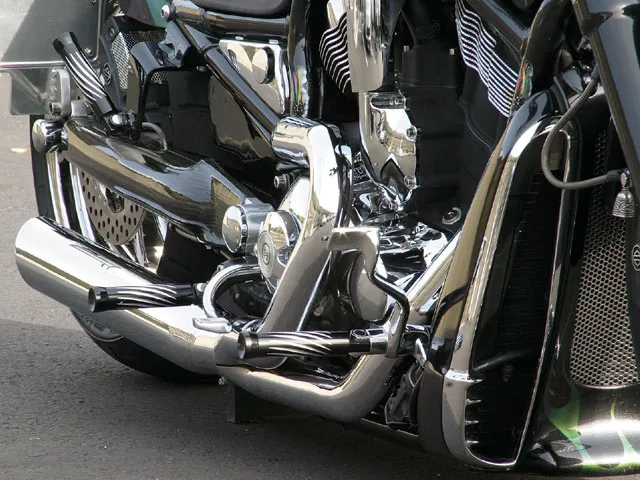
Custom linked mid and forward control break pedals.
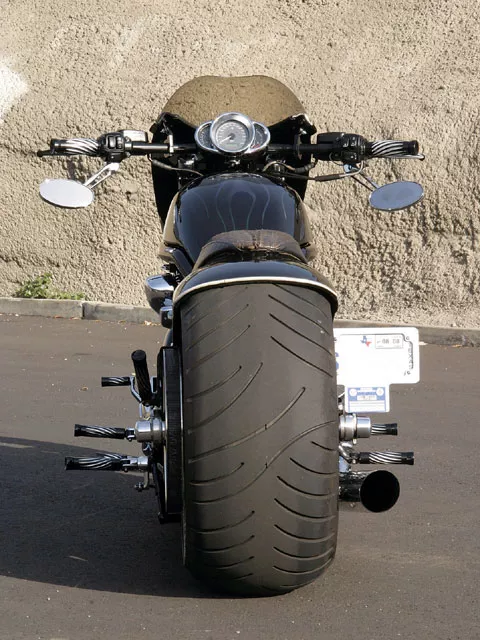
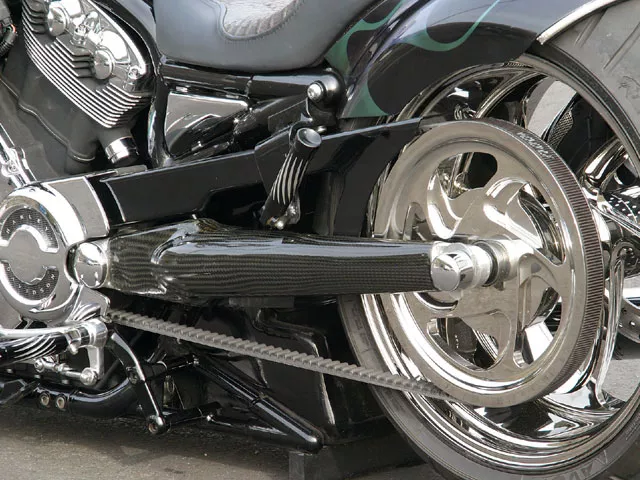
That’s not just for looks, frank added resin and carbon fiber to the custom swingarm to help it be more structurally sound.
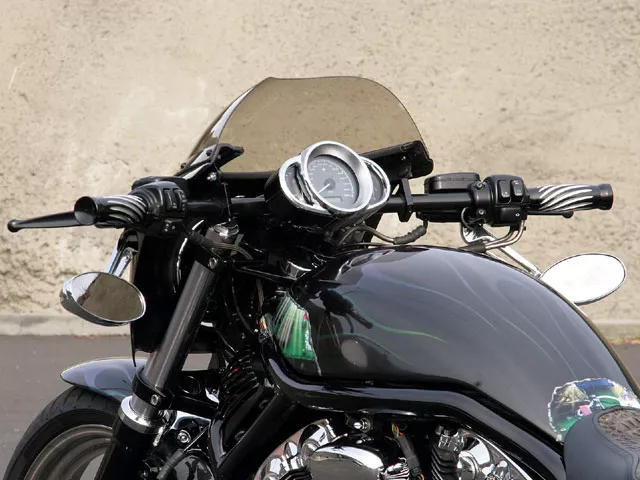
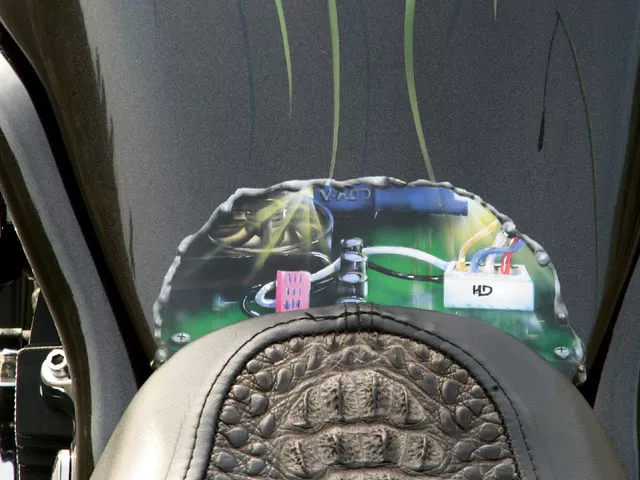
with his background it only made sense to have some electrical components ripping through the paint scheme.
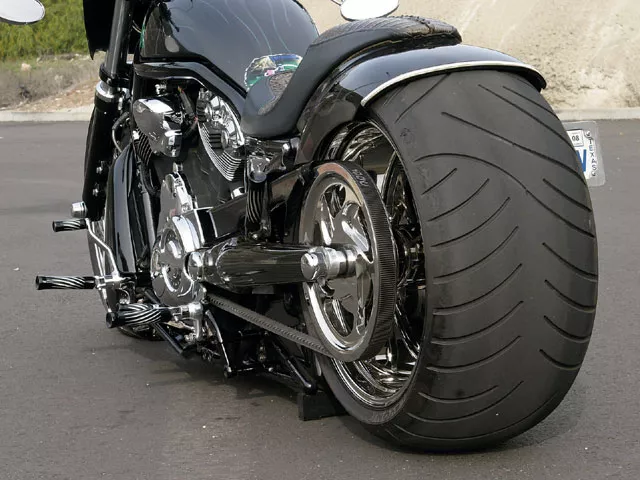
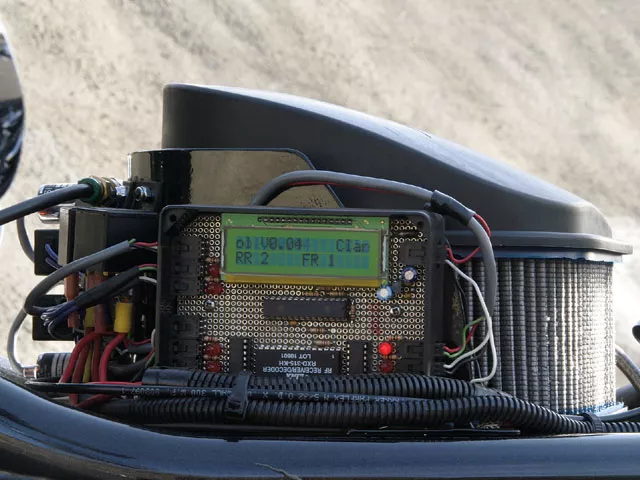
An electronics and software wizard, frank developed a wireless system to control the custom front and rear air ride as well as work as a keyless ignition, and all monitored by this LCD screen.
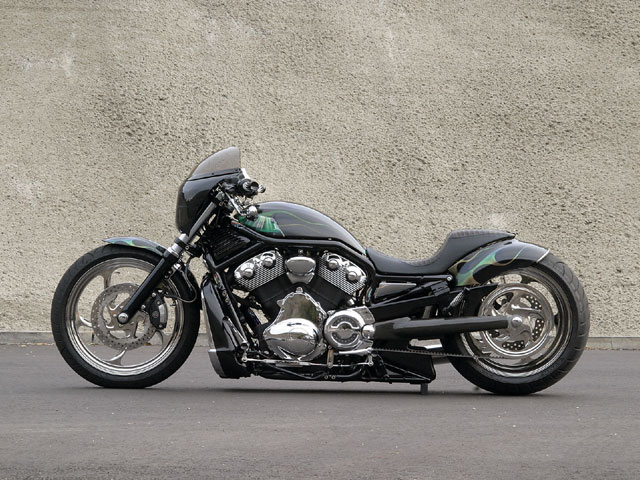
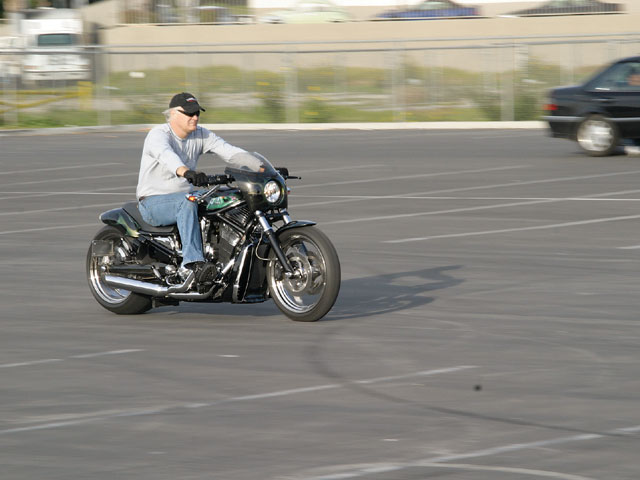
Usually when we get a spec sheet back with the bike’s info and story from the owner, we have to try and decode exactly what it is they are trying to say. This was not the case with Frank Clark of Longview, Texas, and his ’06 Night Rod. Frank did such a good job telling the story of his build that it just made sense to let you hear it straight from him.
In 2004 I purchased my first Harley-Davidson, which was a new ’03 VRSCA V-Rod. Like so many others, I too was bit by the customizing bug and began to add chrome accessories, and changed the seat and exhaust among other things. About that time I joined an online community of fellow V-Rod enthusiasts called 1130CC.com (which is about 20,000 members strong now) and really had my eyes opened up to just how great the VRSC platform could be as a base for a custom bike. Before long I wanted to do much more customizing that would really change the appearance of the bike, but I could not bring myself to cut into the 100-year anniversary model in ways that would permanently alter its original style. At that time I decided that I would purchase a second V-Rod and customize it while I kept the ’03 to ride during the process. After searching the various used motorcycle sources, I decided that I could purchase a brand-new ’05 VRSCB model for nearly the cost of a good used one, so that is what I did. To make a long story short, I stripped that new bike before I rode it and had it completely apart and the motor in a crate within a few days. The success of that project (which was known as BAD V-R) only served to drive my desire to even further customize a V-Rod.
In September of ’05, I decided to sell my ’03 V-Rod (now that the ’05 was done and getting lots of attention) and purchase an ’06 VRSCD Night Rod as a platform. During the next several months I gathered components and ideas, and I began the actual disassembly in February of ’06. Since part of the plan was to have the heads diamond cut and the entire frame painted, I removed the motor and disassembled it, and then sent the heads to Las Vegas.
I knew my biggest challenge was to create a rear suspension system that would support a 300mm rear tire, yet not have the shocks on the side. I considered something like those used on the Softails, but that did not lend itself very well to the motor and tank layout of the V-Rod. After a great deal of Internet searching, I decided that I would attempt a monoshock configuration with an air shock mounted behind the tank in front of the rear tire. Since there was very little room in that area, I kicked around a number of ideas that would allow me enough room to mount the required shock. In the end, I found a tank that Zeel Design makes for a kit they offer that gave me over an inch more room, but that was still not enough. I was really only left with one more option-extend the swingarm. Of course, that had its own problems since the V-Rod belt was already one of the longest made (150 tooth). Once again I was able to get some support from Zeel when they offered to have Gates create a 1-inch, 156-tooth version, which would give me nearly an additional 2 inches in length. That additional length along with the space the new tank provided gave me enough room to house an air shock I found that was built by Biker Buddy Pro for the Victory line of motorcycles.
With a plan for the rear end in my head, I started to work on the swingarm modifications that would be required to extend 29mm (nearly 2 inches) and wide enough for a 10-1/2-inch wheel, cush drive, and pulley. I started by removing the section that connects the two legs to one another. I then made a jig that would support each leg in its stock length (for cutting) and in its extended length for welding and machining. At that point, the two legs were cut in half and 2×3 6061 billet aluminum was machined and shaped to bridge the gap in the extended swingarm. Once the billet pieces were welded into place, the legs were then machined and sanded to smooth the outside while providing a mounting surface on the inside for connecting the two sides together. At that point I began working on the mounting bracket for the top of the shock and the bottom, which also joined the two legs. Those pieces we fabricated from 3/8-inch and 1/2-inch 6061 billet.
Once the swingarm fabrication was complete and I could actually operate the rear end on the frame with the wheel/tire in place, I began to be concerned with the overall strength of the setup. After discussing ideas with a buddy that makes prosthetics (artificial limbs), I decided that I would fill the hollow portion of the legs with resin and carbon fiber and cover the outsides with two layers of carbon fiber braid and resin. After spending some time at my friend’s shop, and using the same processes that go into making artificial limbs, we had some really nice looking and very strong swingarm legs.
Next on the list of items to tackle was the frontend. Since I wanted the bike to slam down, my goal was to have the frontend drop as well for a more even look and lower net drop. It turns out that the V-Rod forks have a long steel tube spacer inside on top of the actual spring. Once I removed that spacer, I was able to source an air cylinder (ram) that had an outside diameter just under that of the inside diameter of the fork tube. I then fabricated an adapter to the end of the ram that would press on top of the spring and keep itself centered. The next step was to modify the existing fork caps to allow the airline for the ram to pass through. Once the new “Adjustable Spacer Cartridge” was finished, I just needed to remove excess oil from the forks (since the old tube was hollow) and install the cartridge. Since the original spring was still able to operate as in a stock configuration, there was no need for the rams to actually perform any shock function. They could simply be filled to a point where they would perform the function of the old spacer, yet drop the front several inches when the air is released.
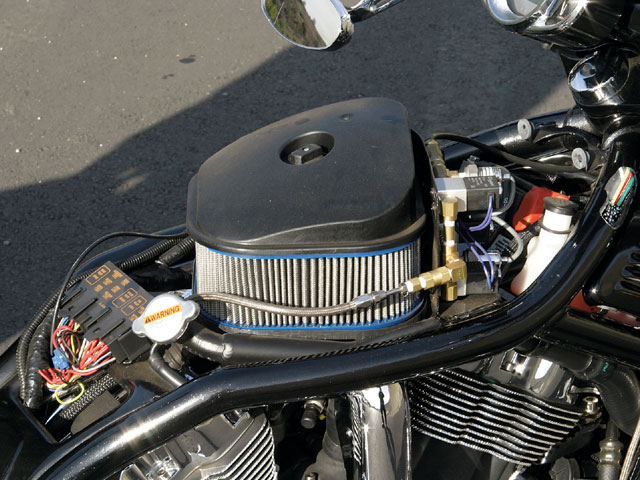
Then I turned my attention to developing a wireless module that would control the air pressure in the front and rear suspension as well as serve as a keyless ignition. After a short time I gathered up the required electrical and pneumatic components, assembled the unit and completed the software. After fabricating a mounting plate that would hold everything around the air filter, I plumbed all of the lines to the rear shock and the two front rams.
With my 6-foot 2-inch height, the mid controls would not suit me for any extended ride at all. However, instead of simply relocating the pegs and controls forward (by using a frame section and mounts from another V-Rod model), I figured I would add a forward control setup and keep the existing position. After a couple days of thinking about the problem on and off, I came up with a novel idea-use the two master cylinders in series. What I mean by that is use the front master cylinder just as it would normally, but instead of running the high pressure side to the caliper, run it to the reservoir side of the mid control master cylinder. The only custom thing I had to make for this setup to work was an adapter that would hold the high pressure line from the front master cylinder to the reservoir side of the mid master cylinder since it was not designed to hold a high pressure hose. Now on long rides I can switch between the two riding positions and not have to worry about my feet being out of position for a quick brake or shift.
Another special feature of this bike is the fairing. I wanted something that would complement the bike and actually add protection when in a tucked position, but the standard fairing that came on the D did not. I choose the Rifle Roadster fairing with the tinted bubble windscreen. I trimmed about 3 inches from each side and fabricated mounts for the handlebar and the lower triple tree from 6061 billet. In order for the headlight to match the fairing, I utilized an assembly from an ’05 B-model V-Rod. While this headlight would match the hole in the fairing, I did have to make an adapter to relocate the headlight forward and down about 1 inch to line up correctly.
At this point the bike was again disassembled and the various parts were sent out for powdercoating, chroming, painting and upholstery. During the reassembly, all stock fasteners were replaced with polished stainless steel from Diamond Engineering, since I learned the hard way on my last build that chrome ones rust right away.
| SPEC SHEET | |
| BIKE OWNER | Frank Clark |
| YEAR/MAKE/MODEL | ’06/V-Rod/Night Rod |
| FABRICATION | Frank Clark |
| ASSEMBLY | Frank Clark |
| BUILD TIME | {{{200}}} hours |
| ENGINE | |
| YEAR/ MANUFACTURER | ’06/H-D |
| TYPE/SIZE | Revolution/1130cc |
| BUILDER | H-D |
| CASES | H-D |
| CYLINDERS | H-D |
| HEADS | H-D/Diamond Heads Machining |
| ROCKER BOXES | H-D |
| EFI | H-D |
| AIR CLEANER | H-D SE Hi-Flow |
| EXHAUST | D&D; Fat Kat |
| TRANSMISSION | |
| YEAR/MANUFACTURER/TYPE | ’06/H-D/5-speed |
| CASE | H-D |
| CLUTCH | Barnett |
| PRIMARY DRIVE | H-D |
| FRAME | |
| YEAR/MANUFACTURER | ’06/H-D |
| RAKE | 34 degrees |
| SUSPENSION | |
| MANUFACTURER FRONT | H-D/Frank Clark |
| TRIPLE TREES | H-D |
| MANUFACTURER REAR | |
| SWINGARM | Frank Clark |
| SHOCKS | Frank Clark/Biker Buddy Pro |
| WHEELS, TIRES, AND BRAKES | |
| MANUFACTURER FRONT/TYPE | PM/{{{Monaco}}} |
| SIZE-HEIGHT/WIDTH | 19×3.5 |
| TIRE/SIZE | Avon/120/70/19 |
| CALIPER | Brembo |
| ROTOR | PM |
| MANUFACTURER REAR/TYPE | PM/Monaco |
| SIZE-HEIGHT/WIDTH | 18×10.5 |
| TIRE/SIZE | Avon/{{{300}}}/35/18 |
| CALIPER | Brembo |
| ROTOR | PM |
| FINISH/PAINT | |
| COLOR | HOK Black Diamond |
| PAINTER | Johnny Edwards |
| GRAPHICS | Johnny Edwards |
| POWDERCOAT | East Texas Powdercoating |
| ACCESSORIES | |
| FRONT FENDER | H-D |
| REAR FENDER | Custom/Frank Clark |
| GAS TANK & CAP | Zeel Design |
| DASH | H-D |
| GAUGES | H-D |
| HANDLEBARS | V-Mod Drag Bars |
| RISERS | H-D |
| MIRRORS | Kryakyn |
| HAND CONTROLS | H-D/Ness |
| FOOT CONTROLS | H-D/Frank Clark |
| FOOTPEGS | Ness |
| HEADLIGHT | H-D from ’05 VRSCB |
| TAILLIGHT | Custom Dynamics ProductsFrank Clark |
| TURN SIGNALS | Frank Clark/Custom Dynamics Products |
| LICENSE MOUNT | Frank Clark |
| SEAT | Custom Black Crocodile |


