
Fork Dynamics
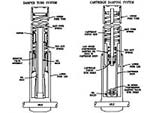
1. On the left is an exploded view of a conventional damper rod fork leg. The unit to the right is a conventional-style leg with cartridge damping.
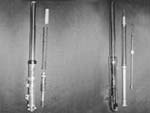
2. This is a better look at the heart of both systems. The cartridge system is at the top and the damper rod is below.
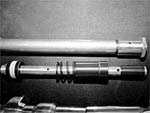
3. Here we can see the main component in making cartridge systems more compliant to road conditions–the high-speed compression valve. The finger is pointing out where the valve resides inside the cartridge tube when installed.
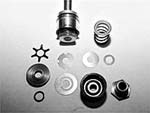
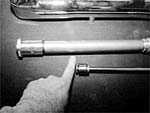
4. There are quite a few parts inside of the high-speed valve. Springs and shim plates of different tensions and tolerances control fluid transition for a particular application.
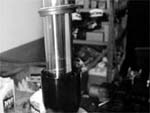
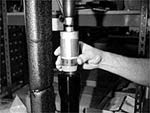
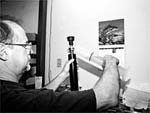
5. Now that you have a basic understanding of the differences between a damper rod and a cartridge system, Steve Storz is ready to walk us through a brief summary of his fork rebuild procedure. He starts by placing a drain pan underneath the fork legs while on the bike and removes the drain plug until he can remove all the oil he possibly can. The front end is pumped up and down a few times to help squeeze it all out. The fork legs are then removed from the triple trees and taken to the workbench. Here we see Steve removing the lower wheel support that holds the axle and tire in place.
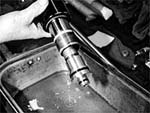
6. The remainder of the oil is carefully poured into a drip pan.
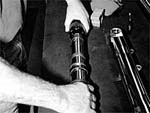
7. The inner cartridge is disassembled, and everything will be cleaned and inspected before going back together.
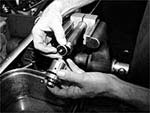
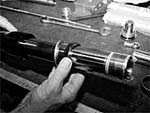
8. The lower dust seal is then removed…
9. …and we can then access the lock ring above the oil seal and remove it.
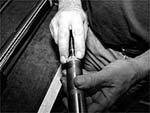
10. The leg is given a few good tugs to break loose the upper bushing and free it from the outer tube.
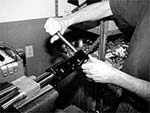
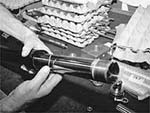
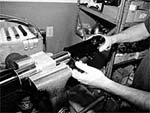
11. Steve takes all the parts to the solvent tank for a thorough cleaning. Here we see the inner tube with the retaining bushing being cleaned for reuse.
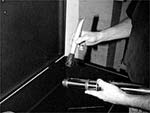
12. Everything passed inspection so we’re ready to put the fork back together. Steve starts by pressing the bushing back in with a special press he designed.
13. With a layer of protective tape over the threads, the steel ring and oil seal are reinstalled. The metal retaining ring and dust seal wi11 follow.
14. The Teflon seal is wrapped around the high-speed compression valve assembly, and it is slid back inside the cartridge tubing.

15. The cartridge and spring are now ready to go back inside the fork leg.
16. Putting on the wheel support is the final phase of the rebuild prior to adding oil.
17. Here we see Steve measuring a predetermined amount of Golden Spectro fork oil and pouring it in. He uses 420 cc in each of his 31/32-inch legs and 490 cc in the 33/34-inch units. Steve cautions us to use only fork oil specified for cartridge-style frontends. Damping rod fork oil is far too heavy and will not work sufficiently with a cartridge-style fork. With the fork leg back together, we only need to bolt it back into the triple trees, replace the wheel, and go for a test ride.
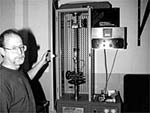
18. This is just a shot we took on the way out of the shop that we thought you’d be interested in. Steve is operating one of the two shock dynos owned by Storz Performance. With this tool, Storz can keep track of shock performance by simulating any type of riding and unimaginable abuse. They then plot out problem areas and take the necessary steps to correct them before a new product goes into production.
We’ve been looking to find someone who could help us explain the differences between damping rod, cartridge, conventional, and inverted forks for some time. Steve Storz, owner of Storz Performance, got wind of our idea and told us that such an article was way overdue, and he was willing to help us with it. We rode up to Ventura, California, and spent the day with Steve as he explained the differences between the systems, followed by a rebuild of one of his own Storz/Ceriani inverted forks.
There are many different types of motorcycle forks, but the types we most commonly run across use either damper rod technology or are of the cartridge variety. Storz provided us with some illustrations to help explain the difference between the two.
The basic purpose of all forks is to keep the front tire contact patch on the ground and relatively uniform in size for optimum handling. There are two basic styles of forks used on bikes: conventional, with the lower legs sliding over the outside of the upper tubing as they go up and down; and inverted, with the lower legs going up and down inside of the upper tubing as they operate. Both damper rod and cartridge-type fluid damping systems could be used for both types of forks, but inverted frontends are almost always of the cartridge type.
First, we’ll cover damper rod, or tube systems. This type of fork uses predetermined orifice sizes (pointed out by arrows) in the damper tube to control rebound and compression movement of the fork. They work well and are cheap to produce, but are limited in their adjustment. There are examples with screw-adjustable orifices, but you are still stuck with your final adjustment: one stage for compression, and one stage for rebound. Around-town and mild riding are adequate, but hitting a severe bump in the road easily overloads the fork and it can’t react fast enough. The front end can’t compress fast enough and feels as though you have solid rods for forks. The cartridge damping system is a vast improvement over the damper rod and adds what is basically another stage of operation. Much like the different stages a carburetor transitions through as speed and load increase, the cartridge-style fork has an additional high-speed circuit to handle sudden bumps in the road. The cartridge (arrow A) is almost like having a shock within a shock. It not only has the standard oil passages like the damper rod (arrow B), it has the high-speed valve (arrow C) to handle fast compression. When oil is compressed at a rate higher than can be handled by the drilled oil passage, a tuned valve in the high-speed compression valve takes over and bleeds off excessive pressure during fast compression to control fork action.
First, we’ll cover damper rod, or tube systems. This type of fork uses predetermined orifice sizes (pointed out by arrows) in the damper tube to control rebound and compression movement of the fork. They work well and are cheap to produce, but are limited in their adjustment. There are examples with screw-adjustable orifices, but you are still stuck with your final adjustment: one stage for compression, and one stage for rebound. Around-town and mild riding are adequate, but hitting a severe bump in the road easily overloads the fork and it can’t react fast enough. The front end can’t compress fast enough and feels as though you have solid rods for forks.
The cartridge damping system is a vast improvement over the damper rod and adds what is basically another stage of operation. Much like the different stages a carburetor transitions through as speed and load increase, the cartridge-style fork has an additional high-speed circuit to handle sudden bumps in the road. The cartridge (arrow A) is almost like having a shock within a shock. It not only has the standard oil passages like the damper rod (arrow B), it has the high-speed valve (arrow C) to handle fast compression. When oil is compressed at a rate higher than can be handled by the drilled oil passage, a tuned valve in the high-speed compression valve takes over and bleeds off excessive pressure during fast compression to control fork action.


